Using EntityFramework 6 Part 1: Introduction and Setup

In this mini series we will be looking at how to implement EntityFramework 6 (from now on referred to as EF) into an MVC application, primarily using Code First methods. In this first part we are going to set up our project.  If you already have a project ready skip to the Setup EF section. If you already have EF version 6 installed feel free to go to part 2: Putting Database Connections into Context.

New MVC Project

I was going to lay out the steps required to create a new project. However, I assume you are able to complete that without step-by-step instructions. Depending on which options you select when creating a new project will determine whether you need to install EF. If you selected an internet application with individual user accounts then EF will have been installed during project creation with a DataContext used for user authentication.

Setup EntityFramework
There are two primary ways to install a NuGet package. By using PowerShell commands in the Package Manager Console or by using a visual interface.
To use the Package Manager Console go to Tools > Nuget Package Manager > Package Manager Console. At the NuGet command line enter this command to install EF

Install-Package EntityFramework -projectname DemoApplication

The -projectname switch forces EF to be installed in a specific project. If you have only one project in your solution you can omit the parameter and use

Install-Package EntityFramework

Either way you should see a message confirming EF has been successfully installed.

To use the visual interface go to Tools > NuGet Package Manager > Manage NuGet Packages for Solution… to open the interface.  On the left select Online and in the search box on the right enter entity framework.

nuget-entityframework6

I already have EF installed which is why you see a green circle with a tick.  If it is not installed then you will see an install button.
Once you have EF installed you are ready to continue.
 

Using HtmlHelpers to generate Custom TextArea (Part 2)

This is Part 2 in a (very) mini series on HtmlHelper methods. Here is the link for Part 1, Using HtmlHelpers to generate HTML elements

This article is about creating a HtmlHelper for a TextArea although the same principles apply for other input controls as well. For this example I have created a simple Employee model class.

namespace HtmlHelpersDemo.Models
{
    public class Employee
    {
        public string Title { get; set; }
        public string FirstName { get; set; }
        public string LastName { get; set; }
    }
}

Nothing special about the controller. An Employee object is instantiated and passed to the view. Following MVC conventions the Index view from the Home folder is rendered.

using HtmlHelpersDemo.Models;
using System.Web.Mvc;

namespace HtmlHelpersDemo.Controllers
{
    public class HomeController : Controller
    {
        public ActionResult Index()
        {
            return View(new Employee());
        }
    }
}

Before looking at the new TextAreaFor HtmlHelper method we will look at how it is called. The method is written as an extension to the Mvc HtmlHelper class (System.Web.Mvc) which allows it to be called the same way the built in TextAreaFor methods are called using @Html..
The first example passes values in a htmlattributes parameter in the form of a class and a data_ref attribute which has an underscore rather than hyphen.

@model HtmlHelpersDemo.Models.Employee
@using HtmlHelpersDemo.Code;
@{
    ViewBag.Title = "Index";
}
<h2>Index</h2>

@Html.TextAreaFor(m => m.FirstName, new { @class = "input" , data_ref="123"}, false)

@Html.TextAreaFor(m => m.FirstName,  false)

Here is the code that does all the work. As mentioned this is written as a HtmlHelper extension method so the first parameter is not actually passed in from the calling code. Rather it defines the class the method is associated with and provides us with a local reference to manipulate, in this instance the local name of HtmlHelper is htmlHelper.

using System;
using System.Linq.Expressions;
using System.Web.Mvc;
using System.Web.Routing;

namespace HtmlHelpersDemo.Code
{
    public static class TextAreaExtensions
    {
        public static MvcHtmlString TextAreaFor<TModel, TValue>(this HtmlHelper<TModel> htmlHelper, Expression<Func<TModel, TValue>> expression, object htmlAttributes, bool IsReadonly)
        {
            var attributes = HtmlHelper.AnonymousObjectToHtmlAttributes(htmlAttributes);
			attributes["class"] = "form-control" + " " + attributes["class"];

            if (IsReadonly)
            {
                attributes.Add("readonly", IsReadonly);
            }

            MvcHtmlString html = default(MvcHtmlString);
            RouteValueDictionary routeValues = new RouteValueDictionary(attributes);
            html = System.Web.Mvc.Html.TextAreaExtensions.TextAreaFor(htmlHelper, expression, routeValues);
			TextAreaFor()
            return html;
        }

        public static MvcHtmlString TextAreaFor<TModel, TValue>(this HtmlHelper<TModel> htmlHelper, Expression<Func<TModel, TValue>> expression, bool IsReadonly)
        {
            return htmlHelper.TextAreaFor(expression, null, IsReadonly);
        }
    }
}

Lets disect what the method is doing. The first line calls a built in method passing in the htmlAttributes parameter. This method replaces underscore characters with hyphens which is how the data_ref is translated to data-ref when rendered.

var attributes = HtmlHelper.AnonymousObjectToHtmlAttributes(htmlAttributes);

As all text area controls is this application requires the form-control css class, it is being added to the attributes in this method along with any other css class passed in throught the htmlattributes parameter.

attributes["class"] = "form-control" + 
    (!string.IsNullOrEmpty( attributes["class"] as string) ? " "+ attributes["class"] : "");

If the IsReadOnly parameter is set, the readonly state of the control is assigned to the attribues object.

if (IsReadonly)
{
	attributes.Add("readonly", IsReadonly);
}

The final four rows create a TextArea input control from the attributes and route values if there are any.

MvcHtmlString html = default(MvcHtmlString);
RouteValueDictionary routeValues = new RouteValueDictionary(attributes);
html = System.Web.Mvc.Html.TextAreaExtensions.TextAreaFor(htmlHelper, expression, routeValues);
return html;

There rendered html for the two examples above looks like this.

<textarea class="form-control input" cols="20" data-ref="123" id="FirstName" name="FirstName" rows="2">
</textarea>

<textarea class="form-control" cols="20" id="FirstName" name="FirstName" rows="2">
</textarea>

Using HtmlHelpers to generate HTML elements (Part 1)

When working in a Microsoft MVC application, creating forms containing form elements is made easier due to the number of available HtmlHelper methods for a TextBox, DropDownList, TextArea etc. Although HtmlHelpers are not only available for form controls, there are helpers for links, view rendering, validation and more built in to the MVC libraries.

At some point there will not be a HtmlHelper that does just what is needed and want to share a few examples of customer HtmlHelpers.

Example 1. Label Helper
This example generates html label page elements. Creating the label is as simple as building a string containing the html to be displayed on the page.

using System.Web.Mvc;

namespace HtmlHelpersDemo.Code
{
    public static class Helpers
    {
        public static MvcHtmlString Label(string labelText)
        {
            return new MvcHtmlString(string.Format("<label>{0}</label>", labelText));
        }

        public static MvcHtmlString Label(string labelText, string forAssociatdControl)
        {
            return new MvcHtmlString(string.Format("<label for='{0}'>{1}</label>", forAssociatdControl, labelText));
        }
    }
}

These methods return an instance of type MvcHtmlString class which represents an HTML-encoded string. MvcHtmlString is a member of System.Web.Mvc namespace (in System.Web.Mvc.dll).

Usage
To display a label we add a using statement at the beginning of our view.

@using HtmlHelpersDemo.Code;
@{
    ViewBag.Title = "Home Page";
}

@Helpers.Label("First Name:")

@Helpers.Label("Last Name:", "SomeControl")

When rendered the page contains the labels as expected.
html-helper-label-code

This is quite a simple example but the method could be applied to creating a html table row or even the whole table.

Using jquery slider as stepped navigation buttons

I was doing some R&D for an application which would have a wizard or survey style interface where the user navigates forwards and backwards through a number of steps. I was looking at using a jQuery slider to display a progress marker which doubled as navigation. Although I did not use this method in the final application here I will describe how to set this up.

To get started we need project. I have created a new MVC project (not Empty) and chose No Authentication. You can choose any authentication option you require.
new-mvc-demo-project

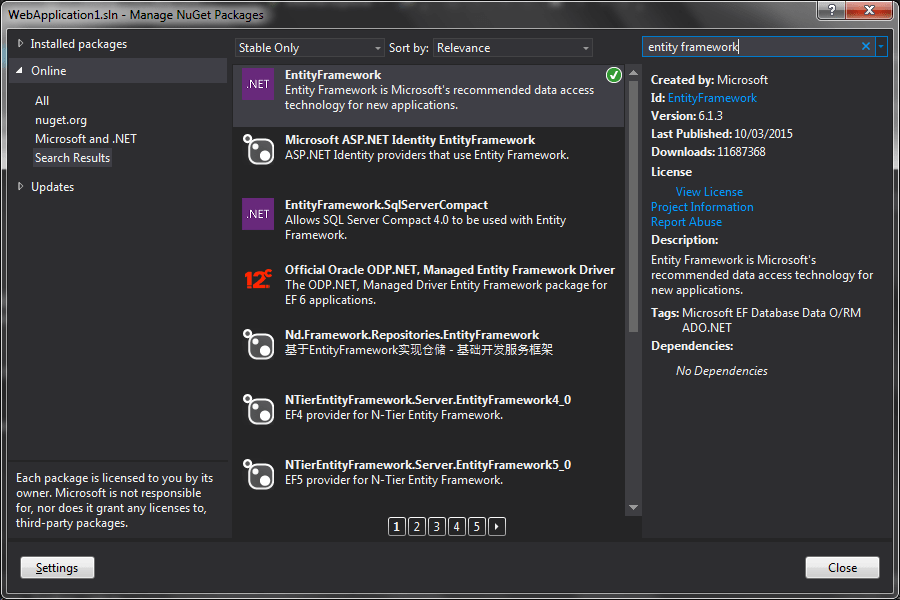
By selecting this project we are off to a running start because jQuery is included. We will need to add jQueryUI library which can be done via NuGet.

Install-Package jQuery.UI.Combined

To use the jQueryUI elements (javascript and css) we can add references in the BundleConfig class (App_Start folder).

bundles.Add(new ScriptBundle("~/bundles/jqueryui").Include(
            "~/Scripts/jquery-ui-{version}.js"));

bundles.Add(new StyleBundle("~/Content/jqueryui").Include(
        "~/Content/themes/base/all.css"));

Now is a good time to create a file to hold our custom javascript, create a file in the Scripts folder called site.js then add a reference to the file in the BundleConfig class like before.

bundles.Add(new ScriptBundle("~/bundles/sitejs").Include(
            "~/Scripts/site.js"));

Any custom styles will be added to site.css which exists in the Content folder and is already included in the Content/css bundle.
These bundles can now be referenced in either the layout page or the individual view. I have added references in the layout page, the styling references I added to the head section.

<head>
    <meta charset="utf-8" />
    <meta name="viewport" content="width=device-width, initial-scale=1.0">
    <title>@ViewBag.Title - My ASP.NET Application</title>
    @Styles.Render("~/Content/jqueryui")
    @Styles.Render("~/Content/css")
    @Scripts.Render("~/bundles/modernizr")
</head>	

The javascript references are added with other javascript at the bottom of the page. Notice the references to both the jqueryui and sitejs bungles.

@Scripts.Render("~/bundles/jquery")
@Scripts.Render("~/bundles/jqueryui")
@Scripts.Render("~/bundles/bootstrap")
@Scripts.Render("~/bundles/sitejs")
@RenderSection("scripts", required: false)

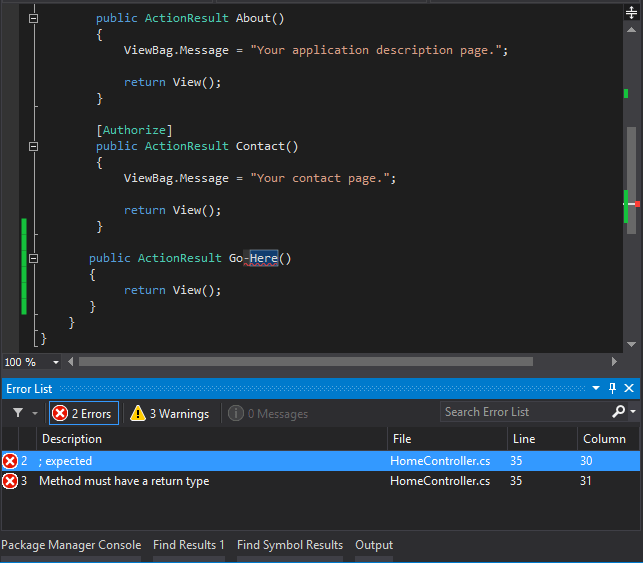
Now we have performed the required setup actions we can now look at the code that makes things happen. For starters we can add action methods in HomeController, one for each step.

public ActionResult Step1()
{
	return View();
}

public ActionResult Step2()
{
	return View();
}	

Create a view for each action (right-click method and select Add View from context menu) and add some basic text like below for step 1

@{
    Layout = null;
}

<h1>Step 1</h1>	

and step 2

@{
    Layout = null;
}

<h1>Step 1</h1>	

Because we are loading a view inside a div of another view, if we did not set the layout to null the rendering engine would apply the layout to the parent view and the child view (loaded in the div).
Setting the layout to null prevents the layout being applied to the child view.

Add some basic styling to the content\site.css file to space out the labels on the slider.

/*  slider style start */
#navSlider label {
    position: absolute;
    width: 20px;
    margin-left: -10px;
    text-align: center;
    margin-top: 20px;
}
    
/* below is not necessary, just for style  */
#navSlider {
    width: 80%;
    margin: 2em auto;
}
/* slider style end */

The final piece of code is the javascript to set up the slider and the action(s) to take each time the value of the slider changes, or in our case each time a label is clicked.
Add this code to the scripts\site.js file created earlier.

$(function () {
    // A slider with a step of 1
    $("#navSlider").slider({
        value: 1,
        min: 1,
        max: 2,
        step: 1,
        change: function (event, ui) {
            $('#contentDIV').load("/home/step" + ui.value);
        }
    })
   .each(function () {

       // Add labels to slider whose values
       // are specified by min, max

       // Get the options for this slider (specified above)
       var opt = $(this).data().uiSlider.options;

       // Calcualte the number of possible values
       var vals = opt.max - opt.min;

       // Position the labels
       for (var i = 0; i <= vals; i++) {

           // Create a new element and position it with percentages
           var el = $('<label >' + (i + opt.min) + '</label>').css('left', (i / vals * 100) + '%');

           // Add the element inside #navSlider
           $("#navSlider").append(el);
       }
   });

    $('#contentDIV').load("/home/step1");
});

Because I have given the views incremental names (step1, step2…) in the Change event it is convenient to use the use the index of the step to build the name of the view to load in the DIV element.
To get the same effect for views where their names are less similar some logic will be needed in the change event of the slider to decide which view to load, for example

change: function (event, ui) {
    var viewName;
    switch(ui.value)
    {
        case 1:
             viewName="overview";
             break;
         case 2:
             viewName="employment";
             break;
         case 3:
             viewName = "training";
             break;
         default:
             viewName = "overview";
    }
    $('#contentDIV').load("/home/" + viewName);
}

After configuring the slider the step1 view is loaded as the default view.
It is easy to change this code to accomodate having more steps by setting the max value on the slider configuration. I have added a link on the download page to a demo application with 5 steps.

Using hyphens in MVC urls for good SEO

Following the Convention over Configuration principle in an ASP.NET MVC application the controller and action names form part of the URL. So commonly a URL of http://www.example.com/account/forgotpassword would break down to;
Domain: example.com
Controller: account
Action: forgotpassword
It is good SEO practise to separate words in a URL with hyphens. One reason for doing this is due to Google and how it interprets the URL. Google will not see underscores as a word separator, so forgot_password will be seen as forgotpassword, there is no benefit in having underscores at all.

When it comes to an MVC application you cannot have hyphens in the action names, the code will not even compile.
hyphen-error

Fortunately there is a way to have hyphens in URLs by using the ActionName attribute on an action method. This method redefines the name used to access the action both from URL or direct code.

[AllowAnonymous]
[ActionName("forgot-password")]
public ActionResult ForgotPassword()
{
    return View("forgotpassword");
}

[AllowAnonymous]
[HttpPost]
[ActionName("forgot-password")]
public ActionResult ForgotPassword(ResetPasswordViewModel model)
{
    if (!ModelState.IsValid)
    {
        return View("forgotpassword", model);
    }

    // other code here

    return View("forgotpassword", model);
}

You can see here both the HttpGet and HttpPost action methods have been decorated with the ActionName attribute. When calling this ForgotPassword action the url will be

http://www.example.com/account/forgot-password

You can no longer call the action without a hyphen. If calling the action from within code, again you will need to use the new redefined action name

// in a controller
RedirectToAction("forgot-password");

// from a link
@Html.ActionLink("Forgot Password","forgotten-password","account")

You will also notice in the top example that the action method signature still contains a method name of ForgotPassword which is the same as the view name. Normally due to the conventions built into MVC you would not need to specify the view name

public ActionResult ForgotPassword()
{
    return View();
}

as the action name has been redefined, when using View() method to display the view the engine will be looking for a view called forgot-password. That is fine of you view is called forgot-password but if not you will need to pass the name of the view as a parameter to the View() method.

[ActionName("forgot-password")]
AtionResult ForgotPassword()
{
    return View("ForgotPassword");
}