Using EntityFramework 6 Part 1: Introduction and Setup

In this mini series we will be looking at how to implement EntityFramework 6 (from now on referred to as EF) into an MVC application, primarily using Code First methods. In this first part we are going to set up our project.  If you already have a project ready skip to the Setup EF section. If you already have EF version 6 installed feel free to go to part 2: Putting Database Connections into Context.

New MVC Project

I was going to lay out the steps required to create a new project. However, I assume you are able to complete that without step-by-step instructions. Depending on which options you select when creating a new project will determine whether you need to install EF. If you selected an internet application with individual user accounts then EF will have been installed during project creation with a DataContext used for user authentication.

Setup EntityFramework
There are two primary ways to install a NuGet package. By using PowerShell commands in the Package Manager Console or by using a visual interface.
To use the Package Manager Console go to Tools > Nuget Package Manager > Package Manager Console. At the NuGet command line enter this command to install EF

Install-Package EntityFramework -projectname DemoApplication

The -projectname switch forces EF to be installed in a specific project. If you have only one project in your solution you can omit the parameter and use

Install-Package EntityFramework

Either way you should see a message confirming EF has been successfully installed.

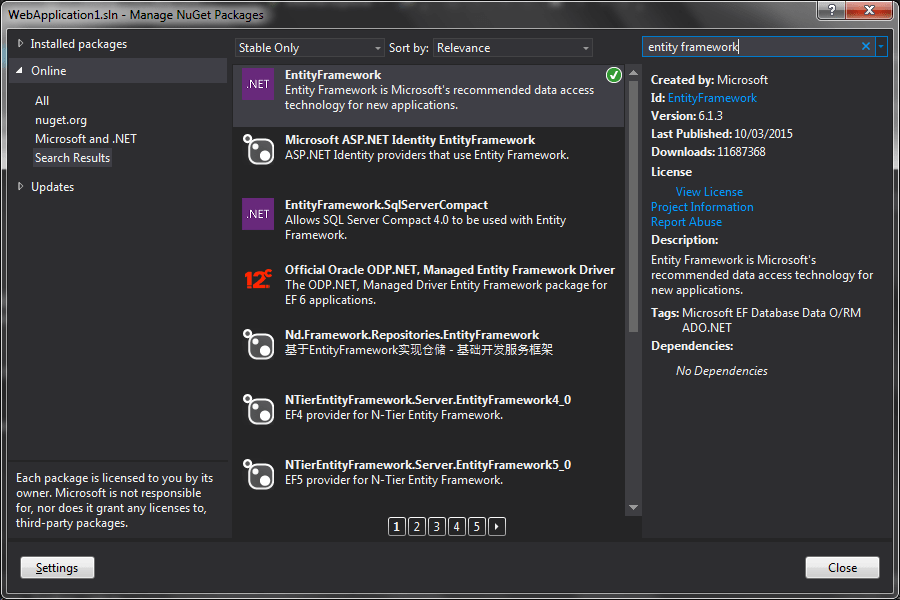
To use the visual interface go to Tools > NuGet Package Manager > Manage NuGet Packages for Solution… to open the interface.  On the left select Online and in the search box on the right enter entity framework.

nuget-entityframework6

I already have EF installed which is why you see a green circle with a tick.  If it is not installed then you will see an install button.
Once you have EF installed you are ready to continue.
 

Simple ASP.Net Gridview Sorting and Paging Example

The simplest way to perform paging and sorting in an ASP.Net webforms application is to use the SQLDatasource control. If you do not use the suite of DataSource controls paging and sorting can manually be achieved without too much extra work.

The page contains a GridView control that has paging and sorting enabled by setting AllowPaging and AllowSorting attributes to true. Height and width are optional.

<asp:GridView ID="GridView1" runat="server" AllowPaging="True" AllowSorting="True" Height="292px" 
OnDataBound="GridView1_DataBound" OnPageIndexChanging="GridView1_PageIndexChanging" OnSorting="GridView1_Sorting" 
Width="600px"></asp:GridView>

As I am not using any data access methods, I have created a private method to generate and return a DataTable of data.

private DataTable GetTableData()
{
	DataTable dt = new DataTable();
	dt.Columns.Add("ProductId", typeof(int));
	dt.Columns.Add("Name", typeof(string));
	dt.Columns.Add("ProductNumber", typeof(string));
	dt.Columns.Add("Quantity", typeof(int));
	dt.Columns.Add("UnitPrice", typeof(decimal));

	Random rnd = new Random();
	for (var i = 1; i <= 100; i++)
	{
		var qty = rnd.Next(1, 100);
		DataRow dr = dt.NewRow();
		dr["ProductId"] = i;
		dr["Name"] = $"Product{i}";
		dr["ProductNumber"] = $"A-{qty}";
		dr["Quantity"] = qty;
		dr["UnitPrice"] = i;
		dt.Rows.Add(dr);
	}
	return dt;
}

The webform has two properties that are used as accessors to values stored in viewstate, the name of the sort column and the sort direction.

public string SortColumn
{
	get {return Convert.ToString(ViewState["SortColumn"]);}
	set {ViewState["SortColumn"] = value;}
}

public string SortDirection
{
	get { return Convert.ToString(ViewState["SortDirection"]); }
	set { ViewState["SortDirection"] = value; }
}

In the page load method, if the page load was not from a postback the default sort direction and sort column is set and the BindGrid method is called.

protected void Page_Load(object sender, EventArgs e)
{
	if (!Page.IsPostBack)
	{
		SortDirection = "ASC";
		SortColumn = "ProductId";
		BindGrid();
	}
}

The Bind Grid method calls the GetTableData method to generate the data and the data is bound to the grid.

private void BindGrid()
{
	var dt = GetTableData();
	if (dt != null)
	{
		//Sort the data.
		dt.DefaultView.Sort = SortColumn + " " + SortDirection;
		GridView1.DataSource = dt;
		GridView1.DataBind();
	}
}

The PageIndexChanging event is raised when one of the pager options is clicked, but before the GridView handles the paging operation. Notice the BindGrid method is called causing the grid to be rebound to the data.

protected void GridView1_PageIndexChanging(object sender, GridViewPageEventArgs e)
{
	GridView1.PageIndex = e.NewPageIndex;
	BindGrid();
}

The Sorting event is raised when the column header link is clicked, but before the GridView control handles the sort operation. Here the sort expression, in this case the data column to sort by and the sort order are set. The data is then rebound by calling the BindGrid method.

		
protected void GridView1_Sorting(object sender, GridViewSortEventArgs e)
{
	SortDirection = (SortDirection == "ASC") ? "DESC" : "ASC";
	SortColumn = e.SortExpression ;
	BindGrid();
}

The DataBound event fires when all the databinding for the GridView is finished. All we do here is find the index of the GridView column that matches the sort expression and add an image to the column header to indicate the current sort direction.

protected void GridView1_DataBound(object sender, EventArgs e)
{
	int columnIndex = 0;
	foreach (DataControlFieldHeaderCell headerCell in GridView1.HeaderRow.Cells)
	{
		if (headerCell.ContainingField.SortExpression == SortColumn)
		{
			columnIndex = GridView1.HeaderRow.Cells.GetCellIndex(headerCell);
			break;
		}
	}

	Image sortImage = new Image();
	sortImage.ImageUrl = string.Format("images/sort-{0}ending.png", SortDirection);
	GridView1.HeaderRow.Cells[columnIndex].Controls.Add(sortImage);
}

That is pretty much it.
JavaScript Confirm on ASP.NET Form Submit

This is a quick demo showing how to prompt the user to confirm when submitting a form on an ASP.Net page.  We start with a simple form.

form

There is some server side code which will populate a label with the current date and time when the form is submitted.

protected void SubmitButton_Click(object sender, EventArgs e)
{
    Timestamp.Text = DateTime.Now.ToString();
}

If the user is simply required to confirm the submitting of the form then an OnClientClick action can be specified.

<asp:Button runat="server" ID="SubmitButton" Text="Submit" CssClass="btn btn-default" OnClientClick="return confirm('Do you want to submit this page?')" CausesValidation="false" OnClick="SubmitButton_Click" />

When the form is submitted it will display the confirmation prompt.
confirm

If the Cancel button is pressed the form will not be submitted. If the OK button is pressed the form will be submitted and the current date and time will be displayed in a label.

form-submitted

The form in this example very simple. In a real application forms are usually more complicated with fields that require validation. Suppose we only want to prompt the user to confirm the form submission if the form is validated. This is still simple to do with very minor changes, the trick is to check the status of the validation on the client side first by calling the Page_ClientValidate method.

<div class="form-group">
    <asp:Label runat="server" AssociatedControlID="Name" CssClass="col-md-2 control-label">Name</asp:Label>
<div class="col-md-10">
        <asp:TextBox runat="server" ID="Name" CssClass="form-control" />
        <asp:RequiredFieldValidator runat="server" ControlToValidate="Name" CssClass="text-danger" ErrorMessage="Name is required." />
    </div>
</div>
<div class="form-group">
<div class="col-md-offset-2 col-md-10">
        <asp:Button runat="server" ID="SubmitButton" Text="Submit" CssClass="btn btn-default" OnClientClick="if (Page_ClientValidate()){return confirm('Do you want to submit this page?')}" CausesValidation="false" OnClick="SubmitButton_Click" />
    </div>
</div>

With this code the form is not valid until the Name textbox contains a value. Only when all the validation controls are valid will the Confirm prompt be displayed. As before, if the Cancel button is pressed the form will not be submitted. If the OK button is pressed the form will be submitted and the current date and time will be displayed in a label.

ASP.NET Web Form – Validate User Agrees Terms and Conditions

Just a quick how-to for anyone wanting to add a conditional check box on an ASP.NET Webform.
You need a checkbox with a prompt. There is a custom validator with a client and server side validation method specified.

<p>
    * By ticking the box below you confirm that you are authorised to do so on behalf of your business & you agree to our terms & conditions (set out above).
    <div>
        <asp:CheckBox  runat="server" ID="AcceptTerms" name="AcceptTerms" ClientIDMode="Static"/> I accept the terms & conditions.
    </div>
    <asp:CustomValidator runat="server" ID="CheckBoxRequired" EnableClientScript="true" SetFocusOnError="true" 
	CssClass="field-validation-error" Display="Dynamic" OnServerValidate="AcceptTermsValidation" 
	Text="You must accept the terms & conditions before continuing." ClientValidationFunction="AcceptTermsValidate" 
	ValidationGroup="MainValidationGroup" />
</p>
<asp:Button id="Button2" Text="Accept Terms and Create Account" OnClick="ContinueBtn_OnClick" 
OnClientClick="return showLoader(this);" runat="server" CssClass="input-form-button"
			  ValidationGroup="MainValidationGroup" />

Code for the javascript validator.

function AcceptTermsValidate(source, args) {
    args.IsValid = $("#AcceptTerms").is(':checked');
}

Code for the server side validator.

protected void AcceptTermsValidation(object sender, ServerValidateEventArgs args)
{
	args.IsValid = AcceptTerms.Checked;
}

If the user does not tick the checkbox and clicks on the button the custom validator Text message will be displayed.

Using DIVs To Scroll A Grid Of Data In A Webform

I would consider this a lazy mans approach to scrolling a grid, it is quick and easy to implement but there are some limitations. It will work for smaller amounts of data where column sorting and paging is not required. Although column sorting can be implemented with a little extra work.

For demo purposes the data I am using is generated by populating a list of Comment objects in the page load event.
Here is the Comment class.

public class Comment 
{
    public DateTime CreatedDate{ get; set; }
    public string UserID{ get; set; }
    public string CommentText{ get; set; }
}

And the data population. Notice how the data is bound to the grid in the usual manner.

protected void Page_Load(object sender, EventArgs e)
{
    var comments = new List<Comment>(){
        new Comment{CreatedDate=DateTime.Now, UserID="John.Jones", CommentText="This request has been approved"},
        new Comment{CreatedDate=DateTime.Now.AddDays(-1), UserID="John.Jones", CommentText="The value is incorrect"},
        new Comment{CreatedDate=DateTime.Now.AddDays(-2), UserID="Phil.Peters", CommentText="Please confirm the quantity required"},
        new Comment{CreatedDate=DateTime.Now.AddDays(-3), UserID="Merry.Berry", CommentText="The request has been amended"},
        new Comment{CreatedDate=DateTime.Now.AddDays(-4), UserID="Peter.Piper", CommentText="Rejected at level 1"},
        new Comment{CreatedDate=DateTime.Now.AddDays(-5), UserID="Fred.Flinstone", CommentText="Initial Submission"}
    };
    CommentsGrid.DataSource=comments;
    CommentsGrid.DataBind();
}

This is how the grid will display on the WebForm.

scrolling-grid

The column headers are cells in a single row table. The header cells and datagrid columns are fixed to the same width to guarantee their alignment.
The following diagram shows how the gridview will sit ‘behind’ the viewable area of the comments-grid-container DIV by virtue of the fixed heights and widths each are given and the overflow attributes of the comments-grid-container DIV.

div-layout
Here is the HTML code used. Although a Datagrid has been used in this case it is possible to have other elements e.g. a Table, Image, another DIV instead.

<form id="form1" runat="server">
    <div class="comments-container ">
        <div class="comments-header-container">
            <table cellspacing="0" cellpadding="0" rules="all" border="1" id="tblHeader" class="comments-header">
            <tr>
                <td style="width: 150px; text-align: center; color: black">Date</td>
                <td style="width: 150px; text-align: center; color: black">User</td>
                <td style="width: 400px; text-align: center; color: black">Comment</td>
            </tr>
        </table>
        </div>
        <div class="comments-grid-container ui-widget-content">
            <asp:GridView ID="CommentsGrid" runat="server" AutoGenerateColumns="False" ClientIDMode="Static" HeaderStyle-CssClass="hidden" GridLines="None" EmptyDataText="There are no comments to display." RowStyle-VerticalAlign="Top">
                <AlternatingRowStyle BackColor="#EEEEEE" />
                <Columns>
                    <asp:BoundField ItemStyle-Width="150px" DataField="CreatedDate">
                        <ItemStyle Width="150px"></ItemStyle>
                    </asp:BoundField>
                    <asp:BoundField ItemStyle-Width="150px" DataField="UserId">
                        <ItemStyle Width="150px"></ItemStyle>
                    </asp:BoundField>
                    <asp:BoundField ItemStyle-Width="400px" DataField="CommentText">
                        <ItemStyle Width="400px"></ItemStyle>
                    </asp:BoundField>
                </Columns>
            </asp:GridView>
        </div>
    </div>
</form>

I have added a resizable jQuery feature to the DIV surrounding the Datagrid with properties which restrict to only allow the height to be resized.

<script src="https://ajax.googleapis.com/ajax/libs/jquery/1.12.0/jquery.min.js"></script> 
<script src="https://ajax.googleapis.com/ajax/libs/jqueryui/1.11.4/jquery-ui.min.js" type="text/javascript"></script> 
<script type="text/javascript">
    $(".comments-grid-container").resizable({
        maxHeight: 300,
        maxWidth: 717,
        minHeight: 75,
        minWidth: 717
	});
</script>

This is now where the magic happens, in the CSS. The wdiths and heights can be changed to suit the layout of the parent page/element.

<link rel="stylesheet" href="https://ajax.googleapis.com/ajax/libs/jqueryui/1.11.4/themes/smoothness/jquery-ui.css"/>

<style>
	.comments-container {
		display: inline;
		width: 750px;
		left: 170px;
		position: relative;
	}

	.comments-header-container {
		height: 20px;
		width: 600px;
		margin: 0 !important;
		padding: 0;
	}

	.comments-header {
		font-family: Arial;
		font-size: 10pt;
		width: 700px;
		color: white;
		border-collapse: collapse;
		height: 100%;
	}

	.comments-grid-container {
		height: 75px;
		width: 717px;
		overflow-y: scroll;
		overflow-x: hidden;
	}

	.hidden {
		display: none;
	}
</style>

As I mentioned at the beginning, this is a quick and easy approach which works but with some limitations. Due to these limitations there a probably fewer scenarios where this approach will work.