Create a local git repository and link to Github

I found two articles here and here which give an overview of common git commands. At the time I was trying to find a way to copy files up to github.com to a newly created repository. It took a bit of trial and error and additional searching but I eventually managed to work out how to create a repository and upload the files. Below is a script of the command used, this assumes the git install folder is referenced in the machine’s Environment Variables to recognise the git command.

If you already have a folder containing files skip the first two points

1) Open Windows Explorer and create a new folder at the desired location.
2) Copy your source files to the newly created folder.
3) Open a command prompt.
4) Change to the new folder, e.g if I created a folder called MyWebsite I would type the following before pressing Enter.

cd my_project

5) To initialise the repository for git versioning type this command.

git init

6) Tell git to check and reference all new files using the * wildcard.

git add *

7) At this point you can check the status of the files in the folder.

git status

A message is output to the command window similar to that below.  As all files are new they will all be listed prepended by new file:. Any modified or deleted files would have the relevant status.

On branch master

Initial commit

Changes to be committed:
(use "git rm --cached ..." to unstage)

new file: project.sln
new file: css/site.css

8) All new/changed files can be committed to the local repository.

git commit -m "Initial Project Commit"

Following this command a message similar to below will be output to the command window.

[master (root-commit) 864b930] Initial Project Commit
2 files changed, 2 insertions(+), 0 deletions(-)
create mode 100644 project.sln
create mode 100644 css/site.css

9) Add a remote origin (location).   Substitute **YourGithubUserName** with your github user name.  Substitute **GithubRepository** with the name of your github repository.

git remote add origin https://github.com:**YourGthubUserName**/**GithubRepository**.git

10) At this point you can now list all remote origins for local repository.

git remote -v

A message similar to below will be displayed in the command window.

origin https://github.com/**YourGthubUserName**/**GithubRepository**.git (fetch)
origin https://github.com/**YourGthubUserName**/**GithubRepository**.git (push)

11)  Before you can push files to the github repository you have to first pull down the current version.

git pull origin master

The command window will display a file similar to this:

From https://github.com/**YourGthubUserName**/**GithubRepository**
* branch master -> FETCH_HEAD
Merge made by the 'recursive' strategy.
LICENSE | 25 +++++++++++++++++++++++++
README.md | 4 ++++
2 files changed, 29 insertions (+)
create mode 100644 LICENSE
create mode 100644 README.md

12) The local repository can now be pushed to github

git push

at which point you will be prompted for username and password.

Username for 'https://github.com':
Password for 'https://**YourGthubUserName**@github.com':

If successfully authenticated a summary of pushed files will be displayed.

Counting objects: 61, done.
Delta compression using up to 4 threads.
Compressing objects: 100% (56/56), done;
Writing objects: 100% (60/60), 458.30 KiB | 0 bytes/s, done.
Total 60 (delta 9), reused 0 (delta 0)
To https://github.com/**YourGthubUserName**/**GithubRepository**.git
4bd0db0..b33bfd8 master -> master

And that is more or less be it. If you log in to your Github account and navigate to the repository folder you should now see all the files.

Create a GitHub repository

On the downloads page are links to some example applications relating to a number of posts on this blog. In this, the first of 2 posts on git I will explain how to create a repository on the Github site.

1. If you haven’t registered with the site go to the Github home page and do that now.

2. Once you have registered make sure you are logged in.

3. Click on the + in the top right of the page and select New Repository from the popup
github-new-repostory

4. On the new repository page enter a name for the repository and if you desire a description. Do not use spaces in the name, use hyphens ‘-‘ instead.
github-new-repository-name

5. Select either a public or a private repository.  At this time a free account is limited to public repositories which are visible to everyone.  A paid account allows you to create private repositories.  In either case the repository owner and contributors are the only people able to update or modify the repository.
github-new-repository-availability
6. It is recommended you add a README file, tick the Initialze this repository with a README box. We will edit the contents of this file later.
github-new-repository-readme

7. There are a number of license options. Click on the information icon (i) for details, different licenses define what you and those downloading the repository contents are responsible for.   I generally go for The Unlicense license as it states the information is offered under public domain and that I cannot be held liable and the recipients are not responsible for any type of recognition or copyright restrictions.
github-new-repository-license

8. Once all the options have been completed above click the Create repository button
github-new-repository-create-button

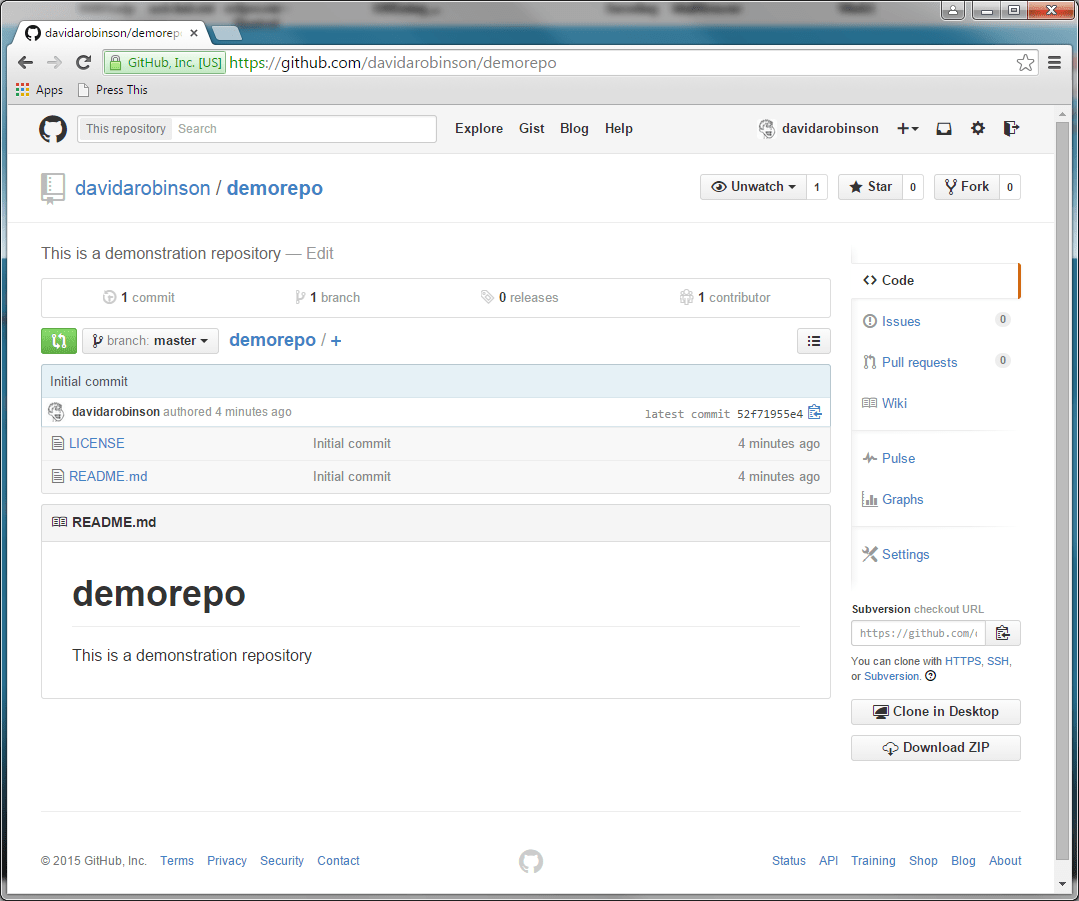
All done!  a repository will now be created,  you will be presented with a page like this.  Depending on the options selected previously you may have fewer, even no files listed.

github-new-repository-complete

Just to complete this example lets modify a file and commit the change back to the repository.

1. Click README.md link in the list of files.
2. When the file is displayed click the pencil icon in the header.

github-new-repository-file-edit

3. In the file editor modify the file.

github-new-repository-file-editing

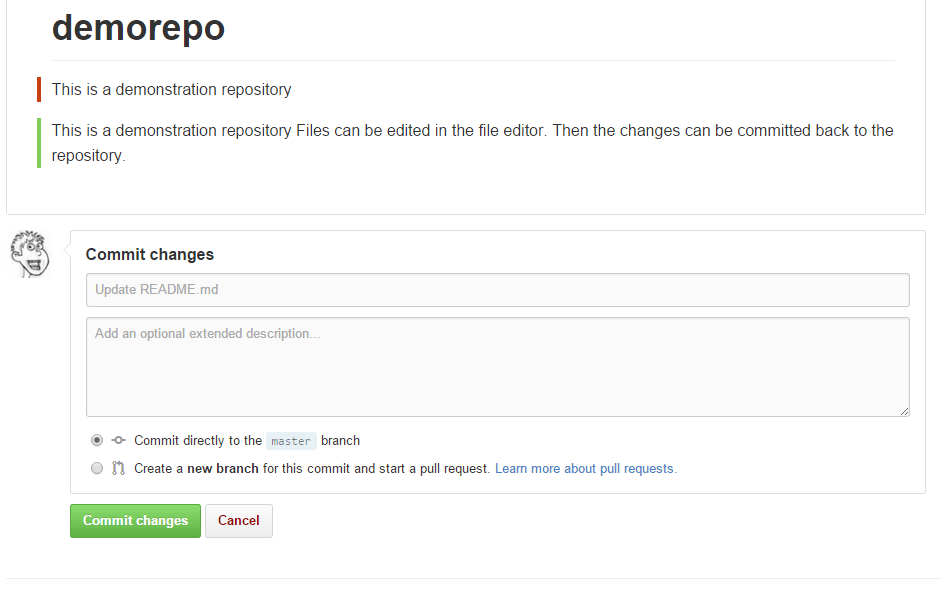
4. When you have finished editing click the Preview changes tab.  Green bars highlight where the changes were made.

github-new-repository-file-comitting


5. At the bottom of the page in the Commit changes section it is good practice to enter an brief explanation of what changes are being committed.  A longer extended description is optional.

6. Click the Commit changes button.  The repository is now updated with the changes made to the readme.md file.


In the second part we will be looking at using the command line to create a local repository, link this to the Github repository and and commit files up to Github.

Creating a new repository with VisualSVN and TortoiseSVN

The following steps describe how to create a new repository in Visual SVN (SVN) and set it up as a working folder for your project code.  There may be alternative ways to perform some of these steps but this is the way I was taught and it has always worked for me.

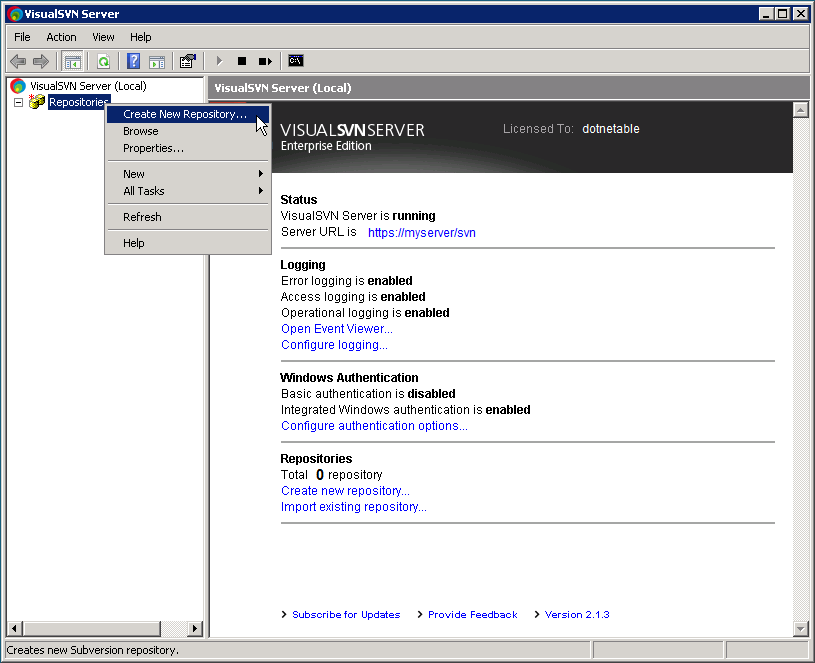
Step 1: Create a new repository in VisualSVN (right click) Repositories > Create New Repository

Create Repository Step 1

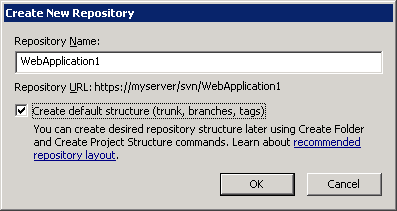
Step 2: Specify the name of the new repository in the ‘Create New Repository’ dialog.  Ensure to tick the checkbox if you want the repository to contain the default folder structure (trunk, branches and tags) and I strongly recommend you do.  In this case the trunk folder will be the main folder containing the code.

Be sure to make a note of the Repository URL, you will need it later.

Create Repository Step 2

Click OK and you now have an empty code repository in SVN.

Step 3: The next step is to set up a working folder on a local drive.  This can be an existing folder containing code for an existing project, or if this is to be a new project a new empty folder.  In this example I am using an existing project.

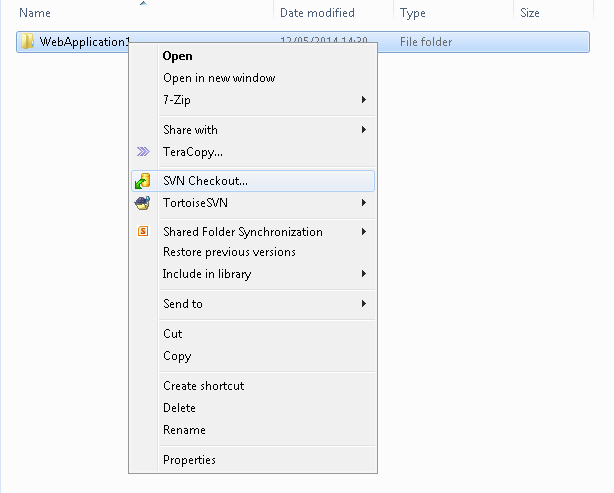
Right-click the working folder and select SVN Checkout from the context menu.

Create Repository Step 3

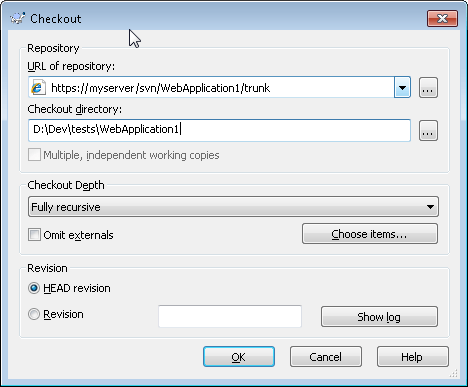
Step 4: In the checkout dialog specify the URL of the repository which you made a note of earlier.

The Checkout directory will prepopulate with the location of the folder you right-clicked on.

Create Repository Step 4

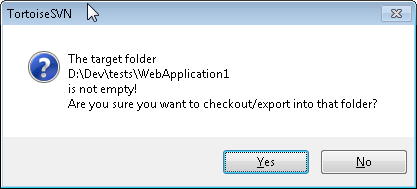
Step 5: After clicking the OK button this dialog will be displayed if the working folder is not empty and already contains project code.  Because we know the SVN repository is empty it is safe to click the Yes button which is what you want to do on this occasion.

If the working folder was empty skip to step 6.

Note: If the SVN repository was not empty and the working folder was not empty you do not want to checkout to the folder as you will potentially end up with mixed projects in the same folder.

Create Repository Step 5

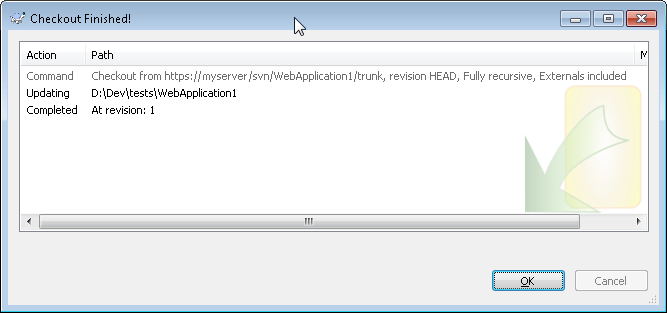
Step 6: The Checkout Finished dialog confirms a working folder has been linked to the SVN repository.  Click OK.

Create Repository Step 6

Step 7: Going back to Windows Explorer you will see the folder now has a green icon (known as an icon overlay).  There are a number of icon overlays describing different states.  The green circle with a tick indicates that the working folder is up to date and in sync with the SVN repository.

Create Repository Step 7

Step 8: If the working folder already contained files and subfolders they will not yet have an icon overlay because we have only set up and linked the working folder with SVN not any of it’s contents that already existed, as they did in my case.

As files and folders are added to the working folder they will not be added to the SVN repository automatically, so they too will not have an icon overlay initially.

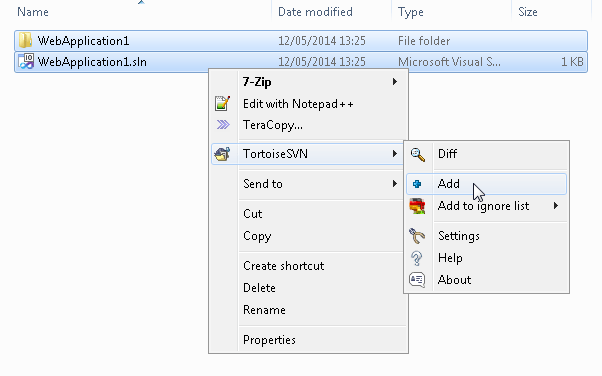
We need to explicitly tell SVN to include the sub files and folders in the repository.  Select all the working folder contents, right-click the selection and select TortoiseSVN > Add from the context menu.

[Every time files or folders are created these steps can be repeated to add them to the SVN repository.]

Create Repository Step 8

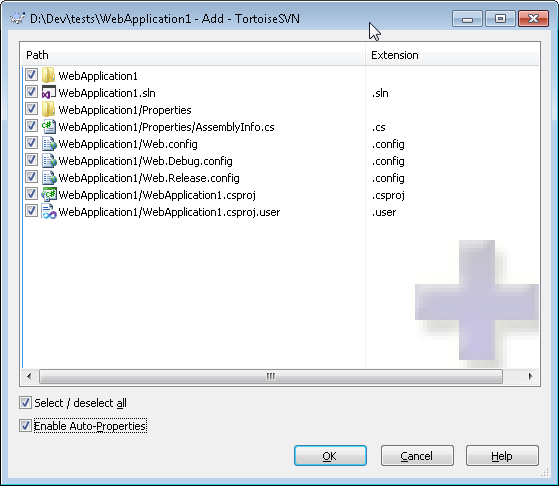
Step 9: The Add dialog is displayed with the folder contents listed.  Un-tick the checkboxes for the items not to be added to the SVN repository, then click OK.  It is common practise to exclude bin and obj folders containing compiled assemblies, solution user options (.suo) and project user files (csproj.user) to name a few.

Create Repository Step 9

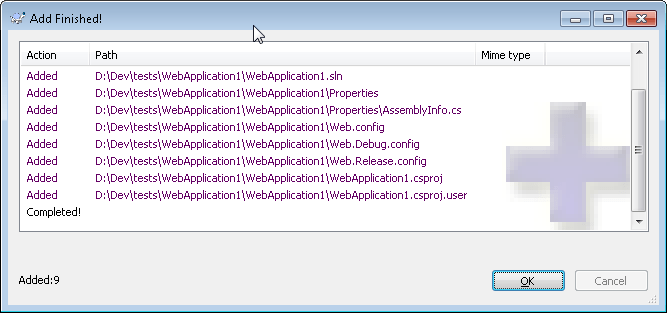
Step 10: Once the OK button is clicked on the Add dialog a new dialog is displayed confirming the contents have been added.

Create Repository Step 10

Step 11:  We are nearly there.  The files and folders added will now have an icon overlay indicating the fact they have been marked for inclusion in SVN,  they have not yet been physically added to the SVN repository .  As in the image below this is usually represented by a blue cross.

Create Repository Step 11

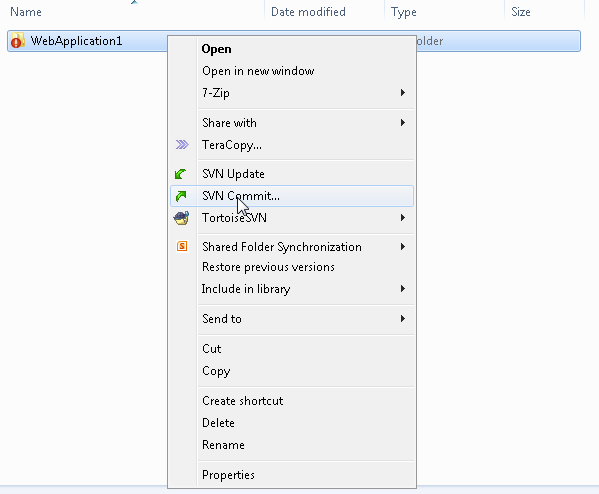
Step 12: To physically add the added items to the SVN repository we need to Commit the changes by returning to the parent working folder, right-clicking on the working folder and select SVN Commit from the context menu.

Create Repository Step 12

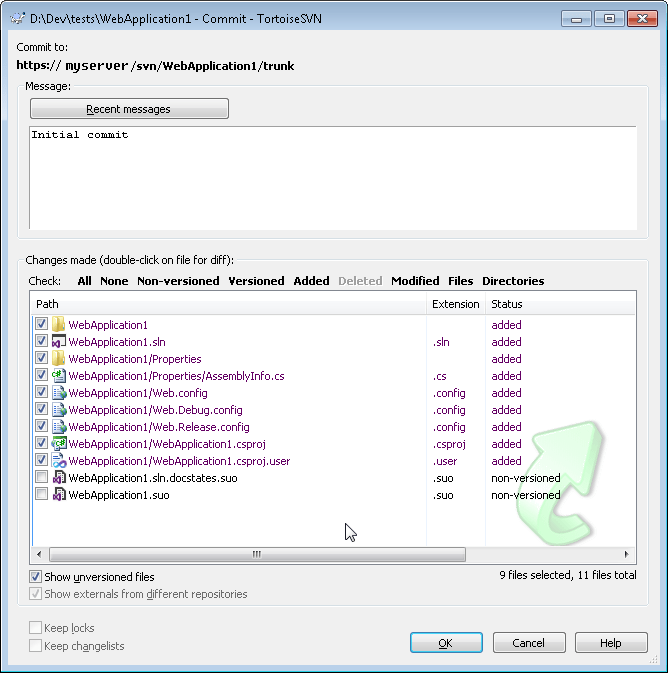
Step 13: The Commit dialog will be displayed.  As this is the initial commit check the path you will commit to.

Always add a meaningful message.  As this is a new project the text ‘Initial Commit’ is sufficient.  If you have been working on an existing project, make the message relevant to the changes being committed. e.g. “Added Logging for person class”.  Add multiple messages for multiple changes.  Alternatively if there are multiple changes to commit, write the message for each change and only select the files relevant to the change, then repeat for the next change and so on.

Create Repository Step 13

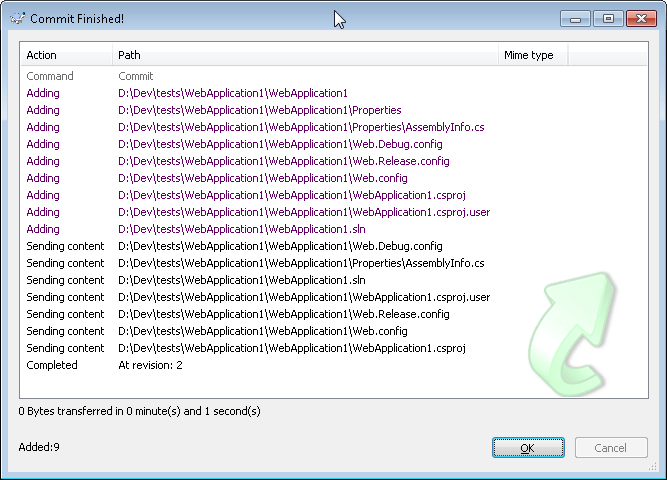
Step 14: After the OK button is clicked on the Commit dialog the list of files committed will be confirmed in the Commit Finished dialog.

Create Repository Step 14

That, as they say, is that.

The Add and Commit actions can be performed as and when required during development.