Massive Selection of Microsoft eBooks

There are millions of ebooks available for download on the internet and not all of them are available legally. However, Eric Ligman (Microsoft Senior Sales Excellence Manager) has compiled a massive list of freely, and legally, available Microsoft ebooks on his blog. They cover a large range of topics including, but not limited to

  • Windows 7
  • Windows 8
  • Windows 8.1
  • Office 2010
  • Office 2013
  • Office 365
  • SharePoint 2013
  • Dynamics CRM
  • PowerShell
  • Exchange Server
  • Lync 2013
  • System Center
  • Azure
  • Cloud
  • SQL Server
  • ASP.NET
  • C#

They are all available by permission of the copyright license/owner which may change in the future. Fot this reason I am not linking directly to any but to view the full list go here: largest-collection-of-free-microsoft-ebooks-ever

Click here for other posts relating to free books.

ASP.NET Conditional Required Field Validation on Client and Server Side

If you have a user input form on an ASP.NET site a RequiredFieldValidator will ensure the user enters a value in the associated field before the form can be submitted to the server.
On more complex forms one field may only be required depending on the value or selection of another field. A RequiredFieldValidator cannot be used as the associated field will always expect user input irrespective of any other field values. A CustomValidator can be used to customise the validation on either the client side, server side or both.

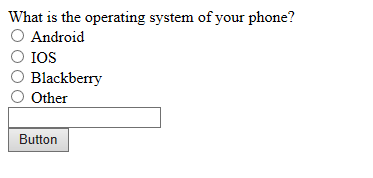
First we need an input form. If the Other radio button is selected a value must be entered in the textbox.
conditional-validation
Here is the full html for the above form. The radio button group consists of individual radio buttons but a RadioButtonList would work too.

<form id="form1" runat="server">
<div>
 <asp:Label runat="server">What is the operating system of your phone?</asp:Label>
 <div>
 <asp:RadioButton ID="AndroidRadioButton" ClientIDMode="Static"
 runat="server" ValidationGroup="PHONEGROUP" GroupName="PhoneOSGroup" />
 <asp:Label ID="Label1" runat="server">Android</asp:Label>
 </div>
 <div>
 <asp:RadioButton ID="IOSRadioButton" ClientIDMode="Static"
 runat="server" ValidationGroup="PHONEGROUP" GroupName="PhoneOSGroup" />
 <asp:Label ID="Label2" runat="server">IOS</asp:Label></div>
 <div>
 <asp:RadioButton ID="BlackberryRadioButton" ClientIDMode="Static"
 runat="server" ValidationGroup="PHONEGROUP" GroupName="PhoneOSGroup" />
 <asp:Label ID="Label3" runat="server">Blackberry</asp:Label>
 </div>
 <div>
 <asp:RadioButton ID="OtherOSRadioButton" ClientIDMode="Static"
 runat="server" ValidationGroup="PHONEGROUP" GroupName="PhoneOSGroup" />
 <asp:Label ID="Label4" runat="server">Other</asp:Label><br />
 <asp:TextBox runat="server" ID="OtherOSTextBox" ClientIDMode="Static"></asp:TextBox>
 <asp:CustomValidator ID="OtherOSValidator" ClientIDMode="Static"
 runat="server" Display="Dynamic" Text="Specify Phone OS"
 ClientValidationFunction="PhoneOSValidation"
 OnServerValidate="PhoneOSValidation" ValidationGroup="PHONEGROUP">
 </asp:CustomValidator>
 </div>
 <asp:Button ID="GoButton" runat="server" Text="Button" ValidationGroup="PHONEGROUP"/>
</div>
</form>

On the custom validator the ClientValidationFunction attribute specifies which javascript method to call to validate the field.

<script type="text/javascript">
    function PhoneOSValidation(Source, args) {
        args.IsValid = true;
        var otherOSRadio = document.getElementById("OtherOSRadioButton");
        var otherOS = document.getElementById("OtherOSTextBox");
        if (otherOSRadio.checked) {
            args.IsValid = ( otherOS.value != "")
        }
    }
</script>

The OnServerValidate attribute specifies which server side code behing method to call to validate the user input.

protected void PhoneOSValidation(object source, ServerValidateEventArgs args)
{
    args.IsValid = true;
    if (OtherOSRadioButton.Checked)
    {
        args.IsValid = (OtherOSTextBox.Text.Length >= 1);
    }
}

If the client side PhoneOSValidation javascript method returns false the form will be invalid and will not be submitted.
If client side validation passes the server side PhoneOSValidation method in the code behind will be called when the page is submitted to the server. Because of the server validation you do not really need the client validation but it certainly doesn’t hurt.

In the button click event checking the Page IsValid property will be true if the form validation passes.

protected void GoButton_Click(object sender, EventArgs e)
{
    if (Page.IsValid)
    {
 
    }
}

File Upload in an ASP.NET MVC Application

Using the upload control in an ASP.NET MVC 4 application is quite straight forward, though there are a couple of gotchas that can catch you out.

In the example below an image can be selected and uploaded to the Uploads folder on the site. The image is then displayed in the page on post back. At this point there is no validation on the type of files being uploaded so anything file other than a valid image file will cause the application to error. Validation will be discussed at a later time.

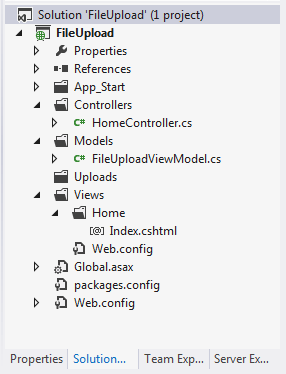
This is how my solution looks in Visual Studio
FileUpload-Solution Explorer

1. View Model (FileUploadViewModel.cs)
The view model has 2 properties. The UploadFilePath property will hold the path of the file to be uploaded. The Url property will hold the relative Url for displaying the image on the page.

using System.ComponentModel.DataAnnotations;
using System.Web;

namespace FileUpload.Models
{
    public class FileUploadViewModel
    {
        [Display(Name="File To Upload")]
        [Required]
        public HttpPostedFileBase UploadFilePath { get; set; }

        public string Url { get; set; }
    }
}

2. The Controller (HomeController.cs)
When a file is selected and submitted the HttpPost Index method checks the model is valid, i.e. a file has been chosen. If a file has been chosen the file is saved in the Uploads folder and the relative Url is populated in the Url property.

using FileUpload.Models;
using System.IO;
using System.Web.Mvc;

namespace FileUpload.Controllers
{
    public class HomeController : Controller
    {
        public ActionResult Index()
        {
            return View(new FileUploadViewModel());
        }

        [HttpPost]
        [ValidateAntiForgeryToken]
        public ActionResult Index(FileUploadViewModel model)
        {
            if (!ModelState.IsValid)
            {
                return View(model);
            }

            var fileName = Path.GetFileName(model.UploadFilePath.FileName);
            var uploadPath = Path.Combine(Server.MapPath("~/uploads/"), fileName);
            model.UploadFilePath.SaveAs(uploadPath);

            model.Url = Path.Combine("/uploads/", fileName);

            return View(model);
        }
    }
}

3. The View (Index.cshtml)
The view displays a ‘file’ type of input control.
One of the things that can catch you out is the form encryption type. Note how it is set to “multipart/form-data”, without this it will not work because your model will be invalid.

@model FileUpload.Models.FileUploadViewModel
@{
    ViewBag.Title = "Index";
}

<h2>Index</h2>

@using (Html.BeginForm("index", "home", FormMethod.Post, new { enctype = "multipart/form-data" }))
{  
     @Html.AntiForgeryToken()
     @Html.ValidationSummary()
    <fieldset>
        <legend>                
                <strong>Files</strong>
        </legend>
        
        <p>
            @Html.LabelFor(m => m.UploadFilePath)<br />
            <input type="file" id="UploadFilePath" name="UploadFilePath"/>
            <br />
            <input type="submit" value="Upload File"/>
        </p>
        <img src="@Model.Url" alt="Uploaded Image"/>
    </fieldset>
}

If no file is selected when the form is submitted the standard Required Field validation message will display ‘The FieldDisplayName is required’ which in this case is exactly ‘The File To Upload field is required’. Which is the same message displayed when the form encryption type is not set.

This is what is displayed when the application is initially running
File Upload Application Running
…and when an image file is uploaded
FileUpload-Uploaded
How Can This Be Enhanced Further?
We could

  • Add validation to limit file types
  • Have the upload locations configurable, different file types could be saved in different locations

Quick Introduction to Page WebMethods

PageMethods can be implemented by the following steps.

1. Include the Services namespace.

using System.Web.Services;

2. Add a public static method to your code behind page and decorate with [WebMethod].

[WebMethod]
public static string GetSalutation()
{
    var salutation = string.Empty;
    var hour = DateTime.Now.TimeOfDay.Hours;
    if (hour >= 0 && hour <= 11)
    {
         salutation = "Good Morning!";
    }
    else if (hour >= 12 && hour <= 16)
    {
        salutation = "Good Afternoon!";
    }
    else
    {
        salutation = "Good Evening!";
    }
     return salutation;
}

3. Add ScriptManager control from the Ajax Extensions tab on the Visual Studio toolbox.

4. Enable page methods in your app by adding EnablePageMethods=”true” to the Scriptmanager markup.

5. Write javascript to call the pagemethod and handle the result.

function GetGreeting()
{
    PageMethods.GetSalutation(onSucess, onError);

    function onSucess(result)
    {
        var ctrl = document.getElementById("Greeting");
        ctrl.value = result;
    }

    function onError(result)
    {
        alert('Cannot process your request at the moment, please try later.');
    }
}

6. Create an interface with elements for invoking the javascript method and displaying the results;

<input onclick="GetGreeting()" type="button" value="Go" />
<input id="Greeting" type="text" value="" />

Possible Issues

1. The scriptmanager must be placed inside the pages Form tags, it it is not an exception will be thrown;

‘ScriptManager’ must be placed inside a form tag with runat=server

2. If you miss off enabling the pagemethods on the scriptmanager a javascript error will be thrown;

‘PageMethods’ is undefined

Final Note

Interacting with page controls must be done in the javascript side as page controls cannot be accessed from with a pagemethod. So any values you need from page controls will need to be passed to the page methods as parameters.

I have added a visual studio project containing a couple of examples including the one above to Github.

Configuration file mail settings

Sending emails is a very common activity for an application to perform. Using the System.Net section in the configuration file (app.config, web.config) to hold the settings makes things easier. There are a few different ways that the settings can be configured and I use a different method for when in development, user acceptance testing or live environments via XML transformation. I will not go into the details of XML transformations here, that is for another day.

Method 1
The first way is to send emails to localhost address 127.0.0.1.

<system.net>
    <mailSettings>
        <smtp deliveryMethod="Network">
            <network defaultCredentials="true" host="127.0.0.1"/>
        </smtp>
    </mailSettings></system.net>

To intercept and read the email grab a dummy SMTP server such as smtp4dev which, when installed sits in the system tray. The received messages can be quickly viewed, saved and the source/structure inspected, but what I find it does not do is format emails in a reader friendly manner which can make checking HTML emails difficult.

Method 2
You can configure emails to be sent to a local folder as an .eml file.

<system.net>
    <mailSettings>
        <smtp deliveryMethod="specifiedPickupDirectory">
            <specifiedPickupDirectory pickupDirectoryLocation="c:\maildrop"/>
        </smtp>
    </mailSettings>
</system.net> 

To view the messages use an application such as MailView. This is my current preferred option as emails can be easily read in both plain text and HTML format. What MailView does not do is refresh the email list as they drop into the designated folder.

Method 3
You can configure the settings to work through a local network SMTP server (e.g. exchange server).

<system.net>
    <mailSettings>
        <smtp deliveryMethod="network">
            <network host="mailserver.domain" defaultCredentials="true"/>
        </smtp>
    </mailSettings></system.net> 

Method 4
To configure an application for hosting on a third party host

<system.net>
    <mailSettings>
        <smtp>
            <network host="smtpout.secureserver.net"
                userName="XXX@XXXcom" password="Password*" port="25"/>
        </smtp>
    </mailSettings>
</system.net> 

For more information relating to mailsettings and descriptions on other attributes not used here see the MSDN article.